From the delicate shimmer of spun sugar to the intricate details carved from chocolate, candy sculptures transform confections into captivating works of art. These edible masterpieces blend culinary skill with imaginative design, inviting us to see sweets not just as treats, but as canvases were craftsmanship and creativity intertwine. In this exploration of candy sculptures unwrapped, we delve into the sweet artistry behind these dazzling creations-discovering the techniques, stories, and artists that turn sugar and spice into mesmerizing visual delights.
Candy Sculpting Techniques That Transform Sugar into Masterpieces
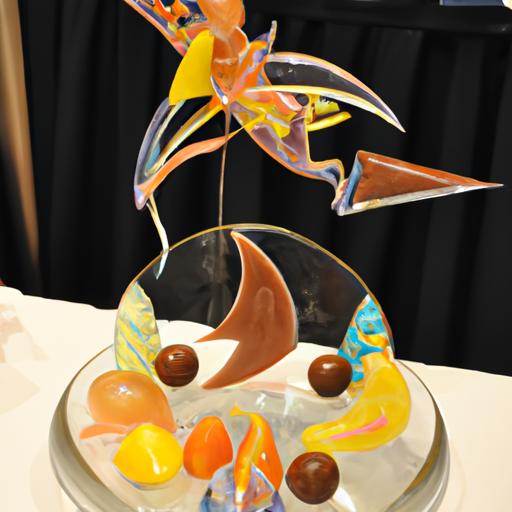
Candy sculptures are an exquisite form of edible art, and mastering them can elevate your confectionery skills to new heights. From delicate spun sugar threads to bold pulled sugar ribbons, the world of candy sculpting offers endless possibilities for creative expression. Using the right combination of clarified sugar,glucose syrup,and vibrant colorants,you can craft intricate designs that captivate both the eye and palate. Candy Sculptures Unwrapped: Sweet Artistry in Treats will guide you through the essential techniques and inspire your first masterpiece.
choosing the Right Ingredients for Durable and Delicious Candy Art
Foundations for durable candy sculptures start with precise ingredient selection. The balance between granulated sugar and glucose or corn syrup is crucial for controlling crystallization and elasticity. pure cane sugar yields a shiny, glass-like surface, while glucose syrup imparts elasticity, making your creation less brittle.Adding a small amount of cream of tartar or lemon juice prevents crystallization, maintaining a smooth finish. For stunning color and shine,opt for professional-grade gel or powder food colorings that withstand high temperatures without burning or fading.
Prep and Cook Time
- Readiness: 20 minutes
- cooking: 15-25 minutes (depending on sculpture size)
- Cooling and Setting: 30-60 minutes
Yield
Produces 1 medium-sized candy sculpture (approx.12 x 8 inches)
Difficulty Level
Medium to Advanced – Requires careful temperature control and timely handling of hot sugar.
Ingredients
- 2 cups granulated sugar
- 2/3 cup light corn syrup (or glucose syrup)
- 3/4 cup water
- 1 tsp cream of tartar
- Gel food coloring (assorted colors, as desired)
- Edible luster dust or gold leaf (optional, for decoration)
- Non-stick cooking spray or a small amount of vegetable oil (for molding surfaces)
- Powdered sugar (for dusting work surfaces)
Step by Step Guide to Crafting Your First Candy Sculpture
- Prepare your workspace. Lightly oil or spray silicone mats and line a heatproof surface with parchment paper dusted with powdered sugar to prevent sticking.
- Combine sugar, corn syrup, water, and cream of tartar in a medium heavy-bottomed saucepan. stir gently to just combine; avoid splashing sugar crystals up the sides, which can cause recrystallization.
- Attach a candy thermometer to the side of the pan, making sure it does not touch the bottom directly. bring the mixture to a boil over medium heat without stirring.
- Cook the sugar syrup until it reaches 300°F (hard crack stage). Watch carefully to prevent burning, swiping any crystals down the sides with a wet pastry brush.
- Remove from heat promptly. Stir in gel food coloring quickly but gently to distribute color evenly.
- Pour the hot syrup onto your prepared surface. Let it cool until it thickens but remains pliable, about 1 to 2 minutes.
- Shape the candy using heatproof gloves. Pull, twist, or fold the candy into ribbons, petals, or abstract forms. Use tweezers or small tools to add fine details.
- For layered or multi-colored effects, allow one layer to partially set before adding another colored ribbon or drop on top.
- Optionally, finish with an edible shimmer. Brush cooled candy lightly with luster dust or apply gold leaf for that dazzling gallery-worthy sheen.
- Let your sculpture set fully at room temperature until hardened and stable, typically 30-60 minutes. Avoid refrigeration, which can cause condensation.
Tips for Displaying and Preserving edible Artworks with Style
Displaying your candy sculpture elegantly enhances both its visual impact and longevity. Place the piece on a pedestal or mirrored tray to amplify light reflections inherent in sugar art.Store in a glass cloche or clear acrylic box with silica gel packets to absorb moisture and prevent sticky surfaces. Avoid humid environments as candy sculptures are hygroscopic and can soften or lose their crisp detail. Keep away from direct sunlight to protect colors from fading.
Chef’s Notes & Tips for Success
- Use a digital thermometer for precise temperature control – this is key for proper hard crack stage!
- Wear heatproof gloves or use silicone tools to manipulate hot sugar safely and prevent burns.
- Do small test batches of colors to understand how they react to heat and shining when cooled.
- Experiment with pulled sugar ribbons by folding softened candy with rapid motions to incorporate air, yielding a pearly and flexible texture.
- If crystallization occurs, gently wash down sugar residue on pan walls with warm water between attempts.
- Reheat hardened candy gently to reshape, but avoid overheating which causes caramelization and cloudiness.
- Store sculptures in a cool, dry place and always display away from moisture to maintain crispness.
Serving Suggestions
Use your candy sculpture as the stunning centerpiece for dessert tables at special events or photo shoots. Pair with delicate florals or edible gold accents to amplify elegance. for an interactive experience, slice thin shards to garnish ice cream sundaes or festive cocktails.They also pair exquisitely with frozen mousse desserts, adding crunch and visual marvel.
| Nutrition (per serving) | Amount |
|---|---|
| Calories | 310 |
| protein | 0g |
| Carbohydrates | 80g |
| Fat | 0g |

Explore more on sugar art techniques in our Sugar Art Basics Guide to enhance your confectionery repertoire. For scientific insights into sugar chemistry, visit Chemistry Explained.
Q&A
Q&A: Candy Sculptures Unwrapped – Sweet Artistry in Treats
Q1: what exactly are candy sculptures?
A: Candy sculptures are intricate, edible artworks crafted from various sugary mediums like pulled sugar, chocolate, isomalt, and fondant. These creations transform simple sweets into visually stunning masterpieces that delight both the eyes and the palate.
Q2: How did candy sculpting become a recognized art form?
A: Candy sculpting has roots tracing back centuries,from ancient sugar craftsmen to modern pastry chefs. Over time, what was once considered simple confectionery decoration evolved into a sophisticated art, blending culinary skill with artistic creativity.
Q3: What materials are commonly used to create candy sculptures?
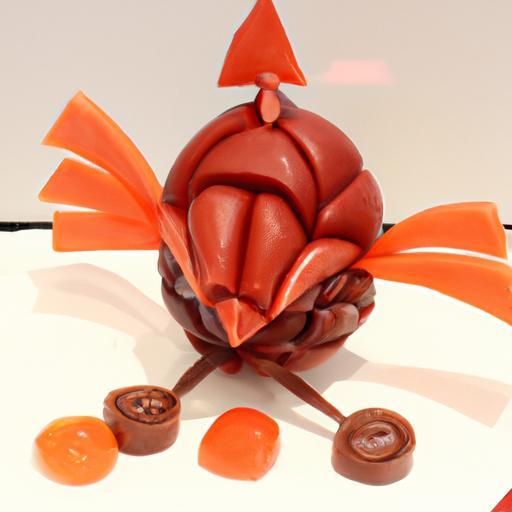
A: Artists often work with pulled sugar for shiny, glass-like pieces; tempered chocolate for details and textures; isomalt for clear, crystal-like components; and fondant for pliable, moldable shapes. These materials allow for vibrant colors, intricate designs, and durability.
Q4: What techniques do candy sculptors use to shape their creations?
A: Techniques include pulling and spinning sugar to create ribbons and flowers, molding chocolate into shapes, airbrushing for vivid color gradients, and assembling multiple pieces into complex structures. Precision tools, heat control, and steady hands are key!
Q5: Are candy sculptures only decorative, or can you eat them?
A: While candy sculptures are edible, their primary purpose is artistic presentation. Manny are crafted with delicate, brittle components that require careful handling. some artists design their pieces to be both a feast for the eyes and a treat for the taste buds.
Q6: What challenges do artists face when making candy sculptures?
A: Candy sculpting demands mastery over temperature-sensitive materials; even slight humidity or temperature changes can cause sugar to crystallize or melt. Working swiftly while maintaining precision,preventing breakage,and balancing aesthetic with edibility are common hurdles.
Q7: How has modern technology influenced candy sculpture artistry?
A: Technological advances like 3D printing molds, food-safe airbrushing, and improved temperature control ovens have expanded creative possibilities. Artists can now achieve even finer details and complex designs that were once impossible by hand.
Q8: Can you create candy sculptures without professional training?
A: While beginners can experiment with simple sugar crafts, achieving impressive candy sculptures typically requires practice, patience, and some formal or self-guided training.Workshops and online tutorials are great gateways into this sweet art.
Q9: Where might you encounter candy sculptures today?
A: Candy sculptures brighten up high-end pastry shops, culinary competitions, extravagant celebrations, museum exhibits, and even fashion shows. They elevate events by adding a whimsical, edible twist to decoration.
Q10: What makes candy sculptures a truly unique form of artistic expression?
A: Candy sculptures blend creativity, science, and sensory delight.They challenge artists to mold fleeting materials into lasting impressions, celebrating the joy of sweetness in shapes that inspire wonder, imagination, and nostalgia-all before the final delicious bite.
the Way Forward
As the final sprinkle settles and the last glossy curve catches the light, candy sculptures reveal themselves not just as confections, but as captivating art forms that marry craftsmanship with creativity. These edible masterpieces invite us to savor more than just flavor-they offer a glimpse into a world where sugar transcends sweetness,becoming a medium for storytelling and imagination.Whether admired behind glass or gently unwrapped, candy sculptures continue to challenge the boundaries between culinary skill and artistic expression, reminding us that sometimes, the sweetest art is the one you can taste.