There’s something undeniably magical about the sizzle of batter hitting a hot griddle, the delicate swirl that forms a paper-thin crepe, and the endless possibilities of fillings waiting to be folded inside. Whether you’re hosting a brunch, a casual get-together, or simply craving a sweet or savory delight, creating your own DIY crepe station can transform an ordinary meal into an interactive culinary adventure. In this guide, we’ll whisk you thru expert tips and clever tricks to help you set up the perfect crepe station-one that’s as fun to assemble as it is delicious to devour. Get ready to flip, fill, and feast like a pro!
Create Your Perfect DIY Crepe Station: Tips & Tricks Guide
Create Your Perfect DIY Crepe Station: Tips & Tricks Guide begins with mastering the essentials to transform a simple batter into delicate, lacy crepes that wow every guest. Originating from Brittany, France, crepes are more than just breakfast; they’re an interactive culinary experience that invites creativity and connection.
Prep and Cook Time
Preparation time: 15 minutes | Resting time: 30 minutes | Cooking Time: 20 minutes
Yield
Approximately 12 medium-sized crepes - perfect for a group gathering or a festive brunch.
Difficulty Level
Easy to Medium: With the right equipment and setup, flipping and styling crepes feels seamless even for beginners.
Ingredients
- 1 cup all-purpose flour, sifted
- 2 large eggs, at room temperature
- 1 1/4 cups whole milk, warmed
- 2 tablespoons unsalted butter, melted (+ extra for the pan)
- 1 tablespoon granulated sugar (optional, for sweet crepes)
- 1/4 teaspoon kosher salt
- 1 teaspoon vanilla extract (optional, for aromatic sweetness)
Instructions
- Prepare Your Batter: In a large mixing bowl, whisk the eggs until smooth. gradually add the flour while continuously whisking to avoid lumps.
- Add Warm Milk: Slowly incorporate the warm milk in a steady stream, stirring gently. This helps the batter achieve a velvety texture.
- Incorporate Butter and Flavor: Blend in the melted butter, sugar (if using), salt, and vanilla extract. Let the batter rest for 30 minutes at room temperature; this enhances the gluten and yields tender crepes.
- Heat Your Crepe Pan or griddle: Preheat a non-stick crepe pan over medium heat. Lightly butter the surface just before pouring.
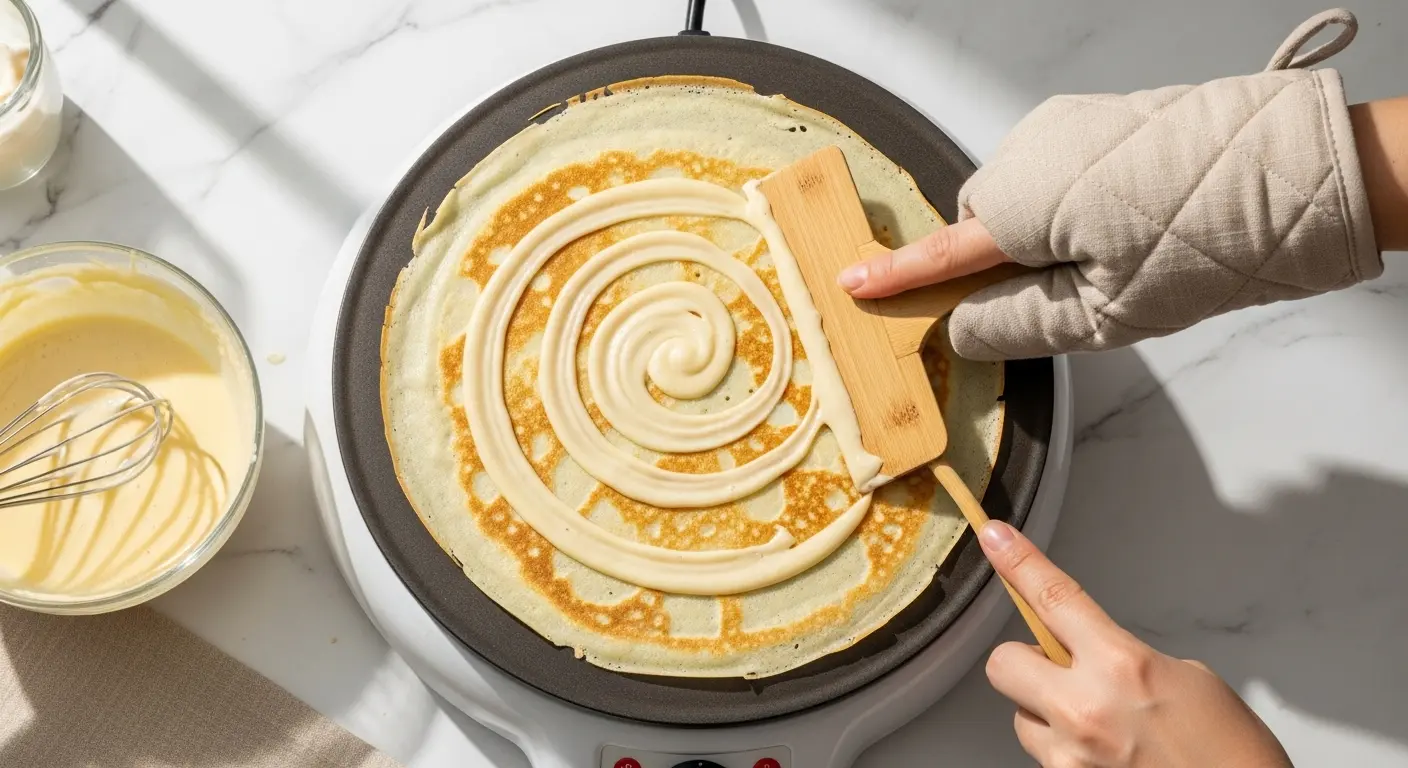
- Pour and Swirl Batter: Pour about 1/4 cup batter into the center and quickly tilt the pan in a circular motion to spread the batter thinly and evenly.
- Cook Each Side: Cook for about 1-2 minutes or until the edges curl slightly and the bottom is golden. Flip with a thin spatula and cook the other side for an additional 30 seconds.
- Stack and Cover: Transfer finished crepes to a warm plate,stacking them with parchment paper in between to prevent sticking.
- Repeat until batter is finished.
Tips for Success
- Choose the Right Equipment: A heavy-bottomed non-stick crepe pan or a smooth electric crepe griddle is essential. Look for a pan about 8-10 inches in diameter with gently sloping sides for easy flipping.
- Perfect Your Batter Consistency: The batter should be thin and pourable, like heavy cream. If too thick,add a splash of milk. Too thin? Add a spoonful of flour.
- Rest the Batter: Letting the batter rest 30 minutes or more is key to evenly hydrated flour and a smooth, elastic texture.
- Butter Sparingly: use a paper towel dabbed with butter to grease the pan lightly – excess butter causes uneven browning.
- Practice Your Flip: Don’t rush the flip; crepes are delicate.Use a thin, wide spatula, and if needed, assist the flip gently with your fingers or another spatula.
- Make-Ahead Tip: Prepare batter a day ahead and keep refrigerated in an airtight container. Gently whisk before use.
Serving Suggestions
Transform your crepe station into a feast for the senses. Present stacks of warm crepes alongside small bowls of toppings and fillings that inspire creativity:
- sweet: Fresh berries, crushed pistachios, whipped cream, Nutella alternative spreads, honey, citrus zest, toasted coconut flakes
- Savory: sautéed mushrooms, baby spinach, shredded Gruyère cheese, smoked salmon, avocado slices, herbed cream cheese
- Garnishes: Edible flowers, powdered sugar dusting, a drizzle of organic maple syrup, fresh mint leaves
Encourage guests to personalize their crepes pairing contrasting flavors and textures, creating a memorable dining experience that’s both interactive and delicious.

| nutrient | Per Crepe (approx.) |
|---|---|
| Calories | 110 kcal |
| Protein | 4g |
| Carbohydrates | 14g |
| Fat | 4g |
For more inspiration on brunch setups, check our Ultimate Brunch Stations Guide.To explore classic French crepes history, visit Britannica’s Crepe Article.
Q&A
Q&A: Create Your Perfect DIY Crepe Station – Tips & Tricks Guide
Q1: What essentials do I need to set up a DIY crepe station?
A: Start with a quality crepe maker or non-stick skillet, a mixing bowl for the batter, and a ladle for pouring. Add spatulas or crepe spreaders to achieve that signature thin layer. Don’t forget plates, napkins, and a variety of toppings and fillings to delight every taste bud.
Q2: How can I make my crepe batter perfectly smooth and easy to work with?
A: Use room temperature ingredients and whisk the batter well to eliminate lumps. letting the batter rest for at least 30 minutes in the fridge allows the flour to fully hydrate, resulting in tender, flexible crepes that won’t tear when flipped.
Q3: Which sweet toppings work best for a crepe station?
A: Think beyond classic sugar and lemon: mix it up with fresh berries, honey, maple syrup, Nutella, whipped cream, and even edible flowers for a whimsical touch. Chopped nuts, fruit compotes, and flavored yogurts add depth and texture without overpowering the delicate crepe.
Q4: What savory options can I offer without using pork?
A: Savory crepes shine with ingredients like sautéed mushrooms, spinach, cheese, smoked salmon, roasted veggies, or avocado slices. Soft goat cheese or ricotta paired with fresh herbs can create sophisticated flavor profiles that impress.
Q5: How do I keep my DIY crepe station organized and user-amiable?
A: Arrange toppings and fillings in separate small bowls or jars, labeling them clearly for easy access.Set the batter and cooking tools in one central spot, while keeping plating and eating utensils on another side to avoid congestion. A simple layout keeps the flow smooth and the experience joyful.
Q6: Can kids get involved in the crepe making fun?
A: Absolutely! Children can definitely help pour and spread the batter (with supervision), choose their favorite toppings, and create their own masterpiece crepes. Kid-friendly combos like banana slices and chocolate spread are always a hit and encourage culinary creativity.
Q7: Any insider tricks to prevent crepes from sticking?
A: Definitely. Make sure your pan or crepe maker is well-heated before pouring batter. Lightly grease the surface with butter or oil using a pastry brush or paper towel-too much fat can create soggy edges, so thin and even coverage is key.
Q8: How do I keep crepes warm without drying them out during the event?
A: Stack cooked crepes between layers of parchment paper and cover them loosely with a clean kitchen towel. A low oven setting (around 150°F/65°C) can keep them warm for an hour or so without turning them rubbery.
Q9: Can I make crepe batter ahead of time?
A: Yes! Prepare the batter a day in advance and store it covered in the fridge. Just give it a good stir before you start cooking. The resting actually improves the batter’s texture, making the crepes more tender and easier to flip.
Q10: How can I add a special touch to my DIY crepe station for a party?
A: Consider themed toppings-think tropical fruits for a summer vibe or spiced apples and cinnamon in the fall. Decorative signage, colorful serving dishes, and maybe even a mini playlist with French café tunes can transform your station into a festive crepe café experience. Bon appétit!
To Wrap It Up
With your DIY crepe station ready to roll, the only thing left is to unleash your culinary creativity and savor every delicious moment. Whether you’re flipping classic French treats or experimenting with bold fillings, this guide has equipped you with the essential tips and tricks to make your crepe-making experience smooth and fun. So gather your loved ones, set up your station, and let the batter flow-because the perfect crepe isn’t just a dish, it’s an experience. Happy flipping!