Ther’s something undeniably satisfying about biting into a breaded turkey cutlet that strikes the perfect balance between crispy crunch and juicy tenderness.Whether you’re seeking a comforting weeknight dinner or an remarkable dish too wow your guests, mastering the art of the breaded turkey cutlet is a culinary skill worth unlocking. In this article, we’ll explore the secrets behind achieving that golden, crisp coating without sacrificing the succulent moisture inside-turning an everyday protein into a masterpiece of texture and flavor. Prepare to elevate your turkey cutlet game with techniques that promise a mouthwatering experience from the first crunch to the last juicy bite.
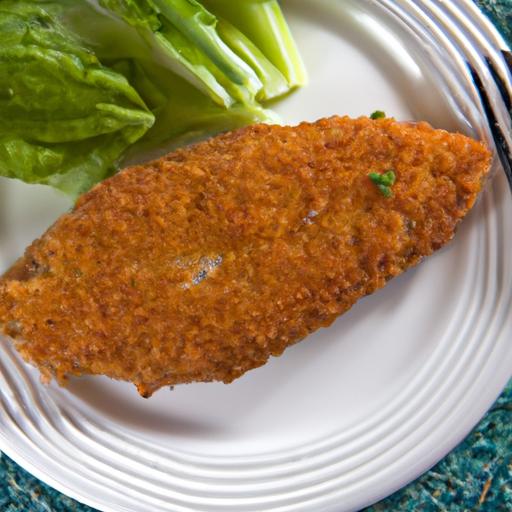
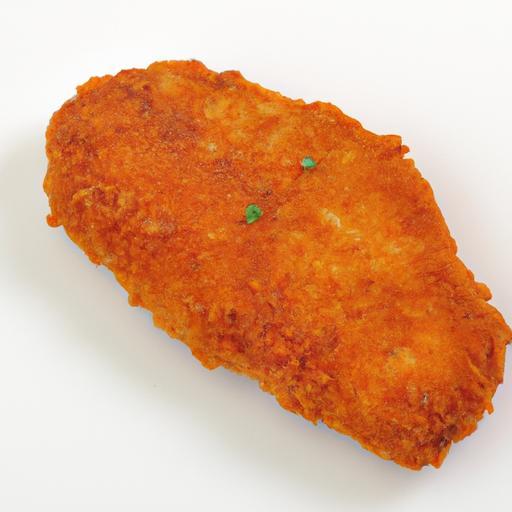
Crispy & Juicy breaded turkey cutlets capture the essence of perfectly cooked poultry: a golden, crunchy exterior enveloping tender, flavorful meat within. This dish,beloved for its comforting simplicity and versatility,stands out by marrying texture and juiciness in every bite. Whether inspired by classic European schnitzels or American homestyle cooking, these cutlets become an instant favorite with their satisfying crispness and succulent interior. Mastering this recipe will elevate your weeknight dinners or impress guests seeking that irresistible balance of crunch and moisture.
Prep and Cook Time
- Preparation: 15 minutes
- Cooking: 12 minutes
- Total Time: 27 minutes
Yield
4 generous servings
Difficulty Level
Easy – Perfect for cooks of all skill levels
Ingredients
- 4 turkey breast cutlets (about 5 oz each, pounded to ¼ inch thickness)
- 1 cup all-purpose flour, sifted
- 2 large eggs, beaten
- 1 cup panko breadcrumbs (for extra crunch)
- ½ cup finely grated Parmesan cheese (adds depth and umami)
- 1 teaspoon garlic powder
- 1 teaspoon smoked paprika (for subtle smokiness)
- Salt and freshly ground black pepper, to taste
- ¼ cup fresh parsley, finely chopped
- ½ cup vegetable oil (such as canola or sunflower) for frying
- Lemon wedges, for serving
Instructions
- Prepare the cutlets: Gently pat the turkey cutlets dry with paper towels. Season both sides with salt and pepper, ensuring an even coat for maximum flavor.
- Create the breading stations: Place the flour in a shallow dish. In a second dish, beat the eggs thoroughly. In a third dish, combine panko breadcrumbs, Parmesan cheese, garlic powder, smoked paprika, and chopped parsley.
- Bread the cutlets: Dredge each cutlet first in the flour, shaking off excess, than dip into the beaten eggs, allowing any surplus to drip off. Press the cutlet firmly into the breadcrumb mixture, coating it evenly on both sides. For an ultra-crispy layer, repeat the egg and breadcrumb step once more.
- Rest the breaded cutlets: Arrange the coated cutlets on a wire rack and let them rest for 10 minutes. This helps the breading adhere and prevents falling crumbs during cooking.
- Heat the oil: In a large skillet, pour vegetable oil to reach about ¼ inch depth. Heat over medium heat until shimmering but not smoking-about 350°F (175°C). Use a kitchen thermometer or test with a small breadcrumb; it should sizzle promptly.
- Cook the cutlets: Carefully place two cutlets at a time into the skillet.Fry for about 5 minutes on each side until they turn a lovely golden brown color and the internal temperature reaches 165°F (74°C). Avoid overcrowding to maintain consistent heat and crispness.
- Drain and keep warm: Remove cutlets and set on a paper towel-lined plate. For serving multiple batches, place cutlets in a warm oven (175°F or 80°C) on a wire rack to maintain crispiness without drying them out.
- Serve instantly: Garnish with fresh parsley and lemon wedges to brighten the rich flavors.
Tips for Success: Elevate Your Breaded Turkey Cutlets
- Choosing the Ideal Turkey Cutlet: Select turkey breast slices that are uniform in thickness. Pounding the meat ensures even cooking and a tender bite,preventing dryness-a common pitfall with turkey.
- Crafting the Ultimate Breading Mixture: mixing panko crumbs with Parmesan adds a fantastic balance of crispiness and flavor depth. For a gluten-free choice, substitute panko with crushed cornflakes or gluten-free breadcrumbs.
- Mastering Cooking Technique: Maintain medium heat to avoid burning your breading before the turkey cooks through. Use a thermometer to guarantee juicy, perfectly cooked meat every time.
- Make-Ahead Tip: Breaded turkey cutlets can be prepped and refrigerated (covered) for up to 4 hours before frying, saving you time on busy days.
- Keep It Crisp: Avoid stacking cooked cutlets. Use a wire rack over a baking sheet to prevent sogginess.
Serving Suggestions
Present these golden-cutlets alongside a vibrant arugula salad dressed with lemon vinaigrette or atop a bed of creamy mashed potatoes. A dollop of garlic aioli or a simple tomato relish works wonders for dipping. Garnish with freshly chopped parsley and a squeeze of lemon to add freshness and zing that contrasts beautifully with the crisp exterior.
| nutrient | Per serving |
|---|---|
| Calories | 320 kcal |
| Protein | 38 g |
| Carbohydrates | 18 g |
| Fat | 10 g |
Explore more about Crispy & Juicy breaded turkey cutlet recipes here and elevate your poultry dishes. For an expert guide on safe poultry cooking temperatures, visit the USDA Food Safety Basics.

Q&A
Q&A: Crispy & Juicy – Mastering the perfect Breaded Turkey Cutlet
Q1: what’s the secret to achieving a crispy exterior on turkey cutlets without drying out the meat inside?
A: The key lies in both the preparation and cooking technique.Start by pounding the turkey cutlets evenly to about ¼-inch thick; this ensures rapid, uniform cooking.Next,a classic breading station-flour,egg wash,and seasoned breadcrumbs-creates a crunchy crust. Cooking over medium-high heat with just enough oil to coat the pan helps seal in moisture while crisping the coating beautifully.Avoid overcrowding your pan to maintain a steady temperature, preventing sogginess and dryness.
Q2: How can I infuse extra flavor into my breaded turkey cutlets?
A: Layer flavor at every step! Season the flour with herbs and spices-think smoked paprika, garlic powder, and a pinch of cayenne for warmth. Incorporate finely grated Parmesan or lemon zest into your breadcrumb mix for a bright, savory punch. Marinating the turkey briefly in buttermilk or a citrus-herb brine before breading also tenderizes and adds subtle tang.
Q3: What type of breadcrumbs yields the best texture?
A: Light, airy panko breadcrumbs are favorites for an irresistibly crunchy bite. Their coarse texture fries up crisp without absorbing excess oil. Though, traditional fine breadcrumbs can give a more uniform, golden crust, especially if mixed with a little grated cheese or herbs. for an artisanal twist, try toasting fresh breadcrumbs until golden before adding them to the breading step.
Q4: Can I cook these cutlets ahead of time? How should I reheat them without losing crunch?
A: Absolutely! After cooking, let cutlets cool completely and store them in an airtight container. To keep the crust intact when reheating,skip the microwave. Rather, warm cutlets in a preheated oven or air fryer at 350°F (175°C) for 5-7 minutes. This method crisps the exterior anew while warming the meat without drying it.
Q5: What sides complement a crispy breaded turkey cutlet best?
A: Bright, fresh sides create a perfect balance. Consider a zesty arugula salad with lemon vinaigrette, garlic-roasted green beans, or a light tomato and cucumber salad. Creamy mashed potatoes or buttery polenta also pair wonderfully if you want something richer alongside the crunch.
Q6: Is it necessary to use oil with a high smoke point for frying turkey cutlets?
A: Yes, oils like canola, grapeseed, or avocado oil are ideal because they tolerate the medium-high heat without burning. This allows you to achieve that golden crust without imparting off-flavors that lower smoke point oils might cause. Plus, these oils fry evenly and yield a delightful crunch.
Q7: Can I bake breaded turkey cutlets instead of frying them?
A: You can, and it’s a lighter option! Arrange the breaded cutlets on a baking sheet lined with parchment and lightly mist the tops with oil spray. Bake at 425°F (220°C) for about 15-20 minutes, flipping halfway through. While baking might not replicate the exact deep-fried crunch, it still produces a satisfyingly crispy exterior paired with juicy meat.
Q8: How do I prevent the breading from falling off during cooking?
A: Following the classic dredge sequence is essential: flour first to help the egg wash stick, egg wash second acts as the glue, then breadcrumbs last to form the crust. Pat the cutlets firmly in the breadcrumbs without pressing too hard to keep the coating loose enough to crisp but secure enough to stay put. Also, let breaded cutlets rest for 10 minutes before cooking to help the crust set.
Q9: What’s a creative twist to personalize traditional breaded turkey cutlets?
A: Try incorporating ground nuts like almonds or walnuts into your breadcrumb mix for both flavor and texture layers. Alternatively, add finely chopped fresh herbs such as rosemary or sage to the breading. For a spicy kick, mix in chili flakes or a touch of smoked chipotle powder. Each tweak transforms the humble turkey cutlet into a signature dish.
Q10: How can I tell when my turkey cutlet is perfectly cooked?
A: Since cutlets are thin, they cook quickly-usually 3-4 minutes per side. The surface should be golden brown and crisp. Internally,turkey cutlets should reach 165°F (74°C) for safe eating but still remain juicy. If you don’t have a thermometer, slice into the thickest part to check that the meat is opaque and no longer pink.
This Q&A aims to untangle the art of breaded turkey cutlets,marrying crisp texture with juicy tenderness for a dish that’s anything but ordinary. Ready to transform your kitchen into a crisp-packed turkey haven? Let’s get cooking!
To Wrap It Up
Whether you’re cooking for a family dinner or prepping a quick weekday meal, mastering the perfect breaded turkey cutlet is a culinary skill that brings crispy, juicy satisfaction to your table every time. With the right balance of seasoning, coating, and cooking technique, you can transform simple turkey breast into a golden, flavorful masterpiece that rivals any restaurant dish. So don your apron, sharpen your skills, and let each bite of your homemade turkey cutlets remind you that great cooking is all about patience, precision, and a little bit of love. Happy cooking!